


“Bow tuning” involves adjustments to variables in the bow and arrow relationship to maximize the efficiency of your shot. Ideally, a well-tuned bow decreases oscillation, displacement, and vibration so that you can hit your target consistently and refine your skills effectively.
Timing
Timing is the synchronization of the eccentrics. Your bow will most likely arrive approximately timed and require some tweaking. The best way to gauge timing is by the feel of the draw. You should feel a single stopping point as you draw the bow almost all the way. Two separate, light stops indicate that your eccentrics need to be adjusted.
Adjusting the Timing
- Choose one end of the bow and twist the cable two turns from that end. Draw the bow and test the feel.
- If the stops feel closer together or become one stop, you are adjusting the cable properly. Continue with the same small turns until the stops synchronize.
- If the stops feel further apart, either twist the cable four turns from the other end or untwist the cable four turns from the same end.
- Continue using small twists until you achieve one solid stop.
Paper Tuning
Paper tuning allows you to observe the angle at which your arrow strikes your mark. From this, you can draw some conclusions about how your bow should be tuned. Steps:
- Place a framed piece of paper about five feet in front of a target.
- Standing 5 feet in front of the paper, shoot your best shot through it.
- Inspect the tear made in the paper for clues about arrow orientation as it leaves the bow.
A shot that leaves the bow neat and straight will produce vane marks centered around the point of penetration.

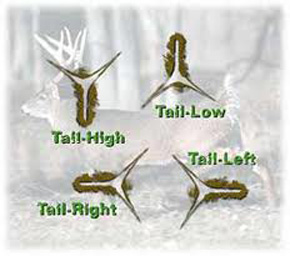
Image Source: PaperTuning.com
Use the puncture patterns (for right-handed shooters) to diagnose problems.
Pattern: Tail High
Suggested Solutions:
- Check wheel timing
- Move nock point down
- Check fletching clearance
Pattern: Tail Low
Suggested Solutions:
- Check wheel timing
- Move nock point up
Pattern: Tail Left
Suggested Solutions:
- Use stiffer shaft
- Move rest left
- Check fletching clearance
- Experiment with grip
Pattern: Tail Right
Suggested Solutions:
- Use weaker shaft
- Move rest right
- Experiment with grip
Pattern: Tail High and Left
Suggested Solutions:
- Check fletching clearance
Arrow and Shaft
Position
The position of the arrow rest is important to a well-tuned system. There are different procedures for aligning this, depending on whether you shoot with a release or not.
Release shooters should install a nock point so its lower edge is approximately 1/8 to 1/4 inch above the rest attachment. The nocked arrow should align with the forward thrust of the string.
- The easiest way to check this alignment is to stand the bow on its bottom wheel.
- Look down on it while comparing the arrow to your stabilizer.
- The arrow and stabilizer should be parallel.
If you release with fingers, your arrow should be pointed slightly to the left (for right-handed shooters).
Finger shooters should install a nock point 3/8 to 1/2 inch above the center of the rest attachment.
Selection Tips
Shaft selection is based upon some key elements: bow weight; arrow length; point weight; release style, and, type of eccentric. Each of these factors impacts significantly on the stress applied to the shaft upon release, specifically, the amount of bend which occurs in the shaft as the bowstring accelerates the tail of the shaft against the resistance of the point.
If your arrows are flying tail-left, indicating a weak spine for on right handed shooters, try one of the following solutions:
- Use a lighter weight point.
- Try composite inserts
- Reduce your draw weight a few pounds.
If paper tuning suggests you need more flexible shafts first try a heavier point or increase your draw weight.
A release aid shooter’s arrow flight is less sensitive to shaft stiffness than a finger shooter’s. A mechanically released arrow is inherently more stable, which allows you to get by with a wider range of shaft sizes.
Tiller Tuning
Tiller tuning is a method to find the point at which you are best able to hold a spot. By making minor adjustments to the tiller, one can usually find a point at which the bow will hold well to the mark.
- Record your nocking point position and reposition your nock each time you make an adjustment to the tiller.
- Select a yardage at which you can shoot very accurately.
- Shoot a group of four to six arrows and evaluate your grouping.
- Beginning with either the top or bottom weight bolt, increase the poundage by 1/4 turn.
- Reposition your nock if necessary and shoot another group. Note how the bow held to the spot in comparison to the previous position.
- Continue in l/4 turn increments for one full turn evaluating the results of the grouping and how the bow held on the target.
- Return the bolt to the original position and repeat the same procedure with the other bolt. There will be one or two points where you should be better able to hold the mark and achieve the desired grouping.